I’ll admit it—the first time I tackled this cake, I was overly confident. “It’s just a Victoria sponge,” I thought. “Simple! Foolproof!” Famous last words. The sponge turned out pale and dense, and the whipped cream melted into a sad puddle because I didn’t wait for the cake to cool properly.
But here’s the thing: this bake is deceptive. It appears straightforward, but achieving that perfect golden rise, soft crumb, and balanced filling requires attention to detail. So, I tried again—three more times, to be exact. I experimented with butter, margarine, room-temperature eggs, cold eggs, and even different tins.
Let me share what actually worked.
Why This Recipe Works So Well
Many Victoria sponge recipes are too conservative—minimal rise, dull texture, and lacking flavor. However, Mary Berry’s version uses cold margarine, which surprised me. I was skeptical about creaming it properly, but it resulted in a tighter crumb that holds up beautifully when layered with cream.
Additionally, the combination of self-raising flour and a touch of baking powder is a game changer. Some recipes overdo it, causing the sponge to dome like a muffin. This one rises evenly, maintaining its intended shape.
Ingredients & Their Importance
-
Cold Margarine: Provides a tender crumb without greasiness. I tried butter once—it was richer, but the sponge didn’t support the filling as well.
-
Superfine Sugar: Dissolves quickly, keeping the texture light. Granulated sugar resulted in a gritty texture—best avoided.
-
Self-Raising Flour + Baking Powder: This combination ensures an even rise without over-inflating the batter.
-
Room-Temperature Eggs: Essential for volume. Cold eggs led to a denser sponge.
-
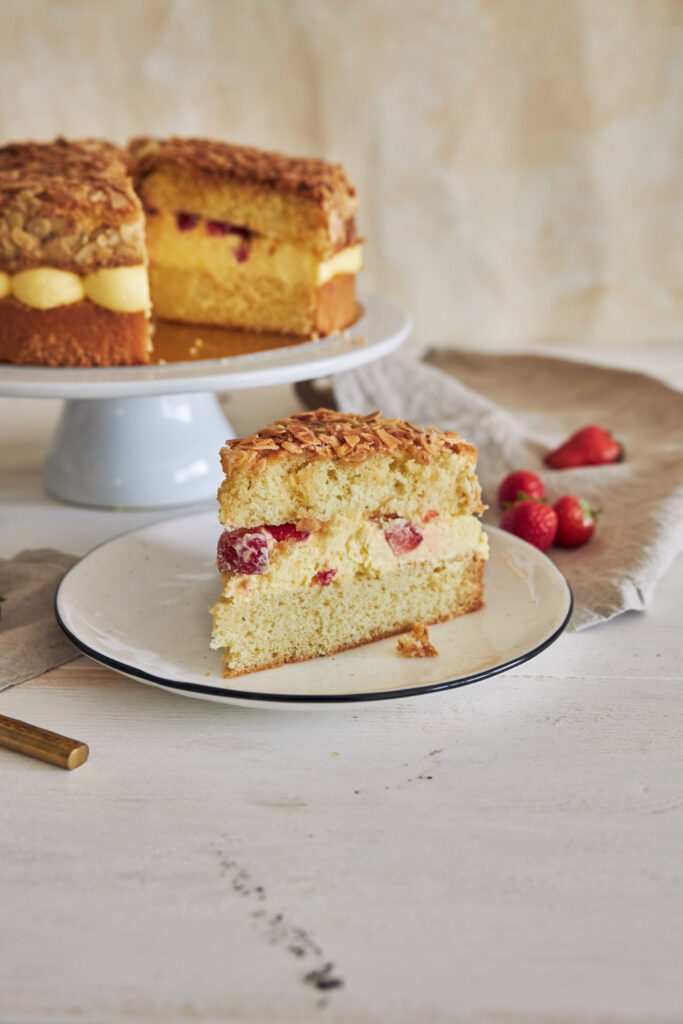
Heavy Cream: Whipped to stiff peaks, it adds structure. Soft peaks won’t hold up.
-
Strawberry Jam: Opt for thick, chunky jam. Runny varieties can seep into the sponge.
Customizing Without Compromising
-
Dairy-Free: I tested with Stork Baking Block and Elmlea Plant Double. Surprisingly good! Just ensure the cream is well-chilled before whipping.
-
No Self-Raising Flour: Substitute with plain flour plus 2 tsp baking powder.
-
Jam Variations: Raspberry works, but avoid seeded jams unless you prefer the texture. Apricot offers a lovely, though less traditional, alternative.
-
Buttercream Instead of Cream: Makes the cake heavier, but it’s a viable option if you prefer.
Common Mistakes & Solutions
| Issue | Cause | Solution |
|---|---|---|
| Sponge didn’t rise | Cold eggs and undermixed batter | Use room-temperature eggs; mix adequately |
| Cream melted | Assembled while cakes were warm | Allow cakes to cool completely before assembling |
| Top sponge slid off | Overfilled with filling | Leave a border around the edge; don’t overfill |
How to Make Mary Berry’s Victoria Sandwich
-
Preheat & Prep: Set oven to 180°C (160°C fan). Grease two 20cm tins and line the bases with parchment paper. I find old metal tins bake more evenly than newer ones.
-
Mix Batter: Combine margarine, sugar, eggs, flour, and baking powder in one bowl. Beat until pale and smooth. If the mixture looks curdled, don’t worry—it usually bakes out fine.
-
Bake: Divide the batter evenly between the tins, level the tops, and bake for 25–30 minutes. The tops should spring back when touched. If the edges pull away from the tins, it’s slightly overdone but still usable.
-
Cool Completely: Let the cakes cool in the tins for 5 minutes, then transfer to a wire rack and remove the parchment. Skipping this step once cost me half a base—lesson learned.
-
Fill: Whip the cream to stiff peaks. Spread jam on one sponge and cream on the other. Sandwich together, keeping the jam away from the edges to prevent it from oozing out.
-
Finish: Sprinkle the top with superfine sugar. Serve with tea and a sense of accomplishment.
Tips from My Kitchen
-
Warm the jam slightly – Just a few seconds in the microwave makes it easier to spread and keeps the sponge intact.
-
Struggling to whip cream? – Pop the bowl and beaters in the freezer for 5 minutes. Cold tools make all the difference.
-
Cake lifter = lifesaver – Especially when assembling. I’ve had too many close calls without it.
-
Serving later? – Chill the fully assembled cake (uncovered) for about 30 minutes. It firms up nicely and slices cleaner.
Storage & Serving
-
Fridge: Best within 2 days. Store it in a cake dome or airtight box to avoid it drying out.
-
Freezing: Sponge layers (without filling) freeze well. Wrap tightly in cling film and freeze for up to 1 month.
-
To serve: Let the cake sit at room temperature for about 20 minutes before slicing. It’s perfect with tea or a chilled glass of lemonade.
Frequently Asked Questions
Q: Can I use butter instead of margarine?
A: You can! Butter adds richness, but the sponge will likely be denser. Margarine gives a better rise here.
Q: Why didn’t my sponge rise evenly?
A: A few culprits: cold eggs, overmixing, or uneven oven heat. Try rotating the tins halfway through next time.
Q: Can I make it the day before?
A: Yes! Just bake the sponge the day before and store it. Fill and assemble on the day you plan to serve.
Q: Do I really need to sift the flour?
A: Not always—but if your flour seems compact or lumpy, give it a quick sift. It can help with a lighter texture.
Q: Can I use whipped topping instead of real cream?
A: Technically yes, but I wouldn’t recommend it. I tried once and it tasted artificial. If you’re going to make this cake, do it properly—real cream is worth it.